Last updated: August 20, 2026
A bathtub safety rail clamps onto the side of the tub and gives a handhold exactly where there usually is not one: at the rim, at the moment of stepping over. It is one of the few pieces of bathroom equipment that needs no drilling, no wall work, and no landlord conversation, which is why it is often the first thing families try.
It is also a product where fit is everything. A clamp is only as good as the tub wall it grips, and tub walls vary far more than the product photos suggest. This guide covers how the clamp works, which tubs it suits, and where a wall mounted grab bar does the job better.
This article contains affiliate links. If you buy through them, we may earn a commission at no extra cost to you. Learn more.
Quick Answer
Does a bathtub safety rail actually work?
- A clamp on rail gives a solid handhold at the rim without drilling, which suits rented homes and tubs where wall mounting is not an option.
- Fit depends on the tub wall thickness and shape. Measure the wall and check it against the clamp range on the listing, and confirm the tub wall is not hollow or tiled over.
- A rail helps with stepping over the rim; it does not replace a grab bar inside the shower area or a seat to bathe from.
Bottom line: measure the tub wall first, because clamp range is the specification that decides whether a rail will fit at all.
What a Tub Rail Is Designed to Do
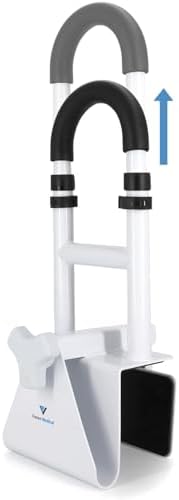
A tub rail is a vertical or curved handle attached to a clamp that grips the top edge of the tub wall. Tightened correctly, it gives something solid to hold while lifting a leg over the rim, which is the point in the routine where most people have nothing to hold at all.
It is designed to provide support at that specific moment. It is not a substitute for a seat, and it does not help much once someone is already standing inside a tub with the shower running, which is a different position needing a different handhold.
Where the Rail Sits Matters
Most rails mount near the outer end of the tub, closest to where a person steps in. Positioning it too far along the tub means reaching sideways at the exact moment balance is loaded on one leg. Try the position with the rail loosely clamped before tightening it down properly.

Measuring Your Tub Wall
Clamp on rails state a wall thickness range on the listing, and that range is the specification that decides fit. Measure the thickness of the tub wall at the point where the clamp will sit, not at the widest point of a shaped rim, and note whether the wall is flat on both faces or curves inward.
Also check what the wall is made of. Clamps are designed for standard acrylic, fiberglass, enameled steel, or cast iron tub walls of a stated thickness. A tiled-in deck, a hollow surround panel, or a tub with a wide flat ledge is a different situation, and forcing a clamp onto the wrong surface is not the answer.
| Tub type | Clamp on rail |
|---|---|
| Standard acrylic or fiberglass alcove tub | Usually suits, check thickness range |
| Enameled steel or cast iron | Usually suits, protect the finish with the supplied pads |
| Tub with a wide tiled deck | Generally not suitable, look at a wall mounted bar |
| Tub inside a hollow surround panel | Not suitable, the clamp has nothing solid to grip |
| Freestanding tub | Depends entirely on rim shape, often not suitable |
| Walk-in shower with a low curb | Not applicable, use a wall mounted bar |
Clamp On Rail Versus Wall Mounted Grab Bar
A properly anchored wall mounted bar is fixed into structure and can be placed exactly where it is most useful, including higher up for standing support. A clamp on rail is limited to the tub rim, but requires no drilling, can be removed without a trace, and moves house with you.
The two are not really competing. Many bathrooms end up with both: a rail at the rim for the step over, and a bar on the wall for standing and for the shower itself. Our shower grab bar guide covers the wall mounted side.
What About Suction Cup Bars?
Suction bars are a third category and a different proposition again. They are designed as a light balance aid on smooth, non-porous surfaces, and manufacturers are explicit that they are not intended to take a person’s full weight. That distinction is covered honestly in our suction grab bar guide.
Fitting and Checking a Tub Rail
Follow the manufacturer’s instructions for the model, since clamp designs and tightening sequences differ. In general: position the rail, seat the protective pads against both faces of the tub wall, tighten evenly, and then check for movement by pulling the rail firmly in several directions before anyone uses it.
Recheck the tightness regularly, ideally as part of a monthly routine. Clamps can loosen with repeated load and with the temperature swings a bathroom sees, and a rail that has worked loose is worse than no rail at all because it will still be trusted.
Protecting the Tub Finish
The supplied pads are there to spread the clamping load and protect the surface. On an acrylic tub especially, over-tightening can mark or stress the wall, so tighten to firm rather than to maximum, and check the instructions for any stated limit.

Heights, Shapes and Extra Length
Some rails offer height adjustment above the rim, which lets the handhold sit closer to standing height rather than only at rim level. Others are fixed. Taller rails give more to hold onto during the step over, at the cost of being more visible in the room.
Two-handle and extended designs exist as well, which suit people who prefer to hold with both hands during the transfer. Check the stated weight capacity on the listing for whichever model you choose rather than assuming a category figure.
Common Mistakes
- Buying before measuring the tub wall. Clamp range is the specification that decides whether it fits.
- Clamping onto a tiled deck or a surround panel. The clamp needs a solid tub wall on both faces.
- Over-tightening on an acrylic tub. Firm is enough; maximum can stress or mark the wall.
- Fitting it too far along the tub. The rail should be where the step over actually happens.
- Never rechecking it. Clamps loosen over time, and a loose rail is still a trusted one.
- Treating it as a complete solution. A rail helps with the rim; a seat and a wall bar cover the rest.
When to Ask for Guidance
If getting over a tub rim has become genuinely difficult rather than just slow, a rail may not be enough on its own and a transfer bench may be the better arrangement. Occupational therapists commonly look at exactly this movement and suggest what fits. If you are unsure what fits your situation, ask your doctor or an occupational therapist.
Frequently Asked Questions
Will a bathtub safety rail fit my tub? It depends on the tub wall thickness and shape. Measure the wall where the clamp will sit and compare it against the range stated on the listing, and check that the wall is solid rather than a hollow surround.
Can a tub rail damage the bathtub? Fitted with the supplied pads and tightened to firm rather than maximum, it should not. Over-tightening on a thin acrylic wall is the situation to avoid, so follow the manufacturer’s instructions.
How much weight can a tub rail hold? Capacities are stated per model on the product listing. Use that figure rather than assuming, and recheck the clamp tightness regularly since load is what loosens it.
Is a clamp on rail as good as a wall mounted grab bar? They do different jobs. A wall bar can be anchored into structure and placed anywhere; a clamp on rail needs no drilling and sits at the rim where the step over happens.
Can I use a tub rail in a rented home? Yes, that is one of its main advantages. It clamps on and comes off without altering the property, unlike a wall mounted bar.
Do I still need a mat or a seat? A rail addresses the handhold, not the floor or the sitting. A non-slip surface inside the tub and a seat to bathe from are separate parts of the same setup.
How often should the clamp be checked? Once a month is a reasonable habit, and immediately if the rail ever feels like it moves under load.
The Bottom Line
A clamp on tub rail is the no-drilling answer to the hardest moment in a bathtub routine, and it fits or does not fit based on one measurement: the tub wall thickness where the clamp sits. Fit it near where the step over happens, tighten to firm with the pads in place, and recheck it monthly. Pair it with a non-slip surface and a seat, and if the rim itself has become the real obstacle, look at a transfer bench instead.