
Last updated: August 20, 2026
Some links on this page are affiliate links. If you buy through them we may earn a commission at no extra cost to you. See our affiliate disclosure.
A grab bar is one of the simplest changes you can make to a home, and also one of the easiest to get wrong. Most people start by searching and end up staring at a wall of near identical stainless tubes, some described as ADA compliant, some sold with suction cups, some angled, some with a shelf attached. The differences look cosmetic. They are not.
What separates a bar that genuinely helps from one that gives a false sense of security is how it attaches to the wall, where it sits relative to the movement it supports, and whether the person using it pulls, pushes, or steadies against it. This guide walks through those decisions in the order they actually matter.
Quick Answer
How do you choose the right grab bar?
- Choose the mounting method first. A screw mounted bar anchored into wall studs or solid blocking is the only type designed to take a person’s full body weight.
- Match the length and angle to the movement being supported, not to the space available on the wall.
- Suction cup bars are sold as balance aids by their own manufacturers and are not rated to hold body weight, so treat them as a travel or steadying accessory rather than a substitute.
- Look for a knurled or textured gripping surface if wet hands are the concern, and check the stated weight rating on the product listing.
Bottom line: mounting method decides whether a grab bar is genuinely supportive, and everything else is a refinement on top of that decision.
What a Grab Bar Actually Has to Do
A grab bar handles one job: giving a hand something fixed to hold while the body changes position. That covers stepping over a tub wall, standing up from a toilet, turning in a wet shower, and steadying on a threshold. Each movement pulls on the bar from a different direction, which is why placement and orientation matter more than brand.
The force involved is larger than most people expect. Someone who loses balance does not lean gently on a bar, they catch themselves on it. That is the load a properly mounted bar is engineered around, and it is why a bar attached only to drywall or smooth tile is a different product category entirely.
Grab Bars by Situation
Rather than ranking models, it helps to shop by the situation you are solving. Most homes end up with a combination rather than a single bar.
The Standard Workhorse: A Straight Stainless Bar
A straight bar in brushed or satin stainless is the default for a reason. It comes in a wide range of lengths, it mounts horizontally, vertically, or on a diagonal, and the finish holds up in a wet room. If you are buying one bar and are not yet certain where the second will go, this is the safe starting point.

Where a Longer Reach Is Needed
Longer bars suit tub walls and long shower runs, where the hand travels with the body rather than holding one fixed point. They also span more framing, which makes it easier to hit two studs cleanly instead of relying on anchors at one end.

Angled and Curved Bars for Getting Up
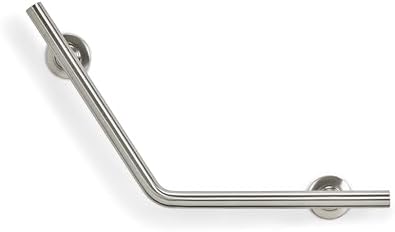
An angled or wave shaped bar suits the sit to stand movement, because the hand rises and moves forward at the same time. Families often choose these beside a toilet or at a walk in shower entry, where a horizontal bar twists the wrist at the end of the movement.
When Floor Space Is Tight
Flip up bars mount to a single wall and swing out of the way, which makes them useful in a small bathroom or beside a toilet with no side wall. Check the listed projection and weight rating, and confirm the wall behind can take the concentrated load, since all the force lands on one plate.

Temporary and Travel Situations
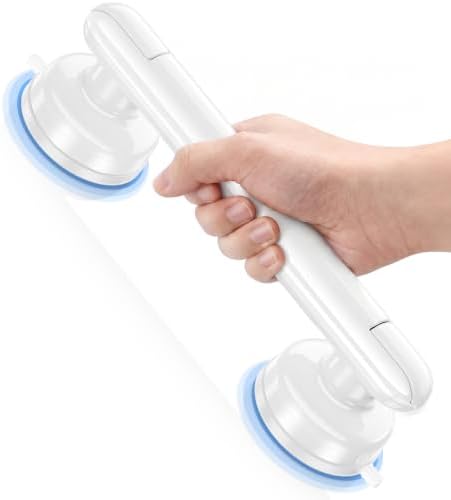
Suction mounted bars have a genuine place in hotel rooms and short stays where drilling is impossible. Their own manufacturers describe them as balance assists rather than weight bearing supports, and that limit is worth taking literally. Our honest look at suction grab bars covers when they are reasonable.
Mounting Types Compared
Everything above narrows to one question: how does the bar transfer force into the building. The table below is the short version, and it is the part worth getting right before comparing finishes.
| Mounting type | What it means in practice |
|---|---|
| Into wall studs | Screws land in solid framing; the standard method and the one manufacturers write their weight ratings around |
| Into blocking | Plywood or lumber added behind the wall during a remodel; gives full freedom on placement |
| Heavy duty wall anchors | Purpose built anchors for hollow walls; follow the anchor maker’s rating rather than the bar’s |
| Clamp on tub rail | Clamps to the rim of a bathtub instead of a wall; useful where no wall is reachable |
| Suction cup | Balance aid only, not rated for body weight, needs rechecking before every use |
| Floor to ceiling pole | Tension mounted between floor and ceiling; depends entirely on solid surfaces at both ends |
If your walls are tiled and you cannot find framing where you need it, the options do not run out. Our guide to mounting grab bars without studs walks through anchors and blocking in more detail.
Length, Diameter, and Grip Texture
Once mounting is settled, three details separate a bar someone uses confidently from one they avoid. Length should cover the whole movement, diameter should fit the hand, and the surface should stay grippable when wet.
Diameter is the detail most often skipped. A bar that is too thick cannot be wrapped by a smaller hand, and a bar that is too thin gives less contact area. The ADA standard for public facilities specifies a circular cross section between 1 and 1/4 inches and 2 inches in diameter, which is a sensible range to shop within at home even though home installations are voluntary. Polished chrome, meanwhile, turns slick under soapy hands, so a knurled or peened gripping section is worth more than the finish.
What the ADA Standard Says About Grab Bars
The ADA Standards for Accessible Design apply to public and commercial facilities rather than private homes, but they are the clearest published reference available and manufacturers design to them. Borrowing the numbers avoids guessing, as long as you adapt them to the person using the bathroom.
The standard specifies grab bars mounted with the top of the gripping surface 33 to 36 inches above the floor, a clearance of 1 and 1/2 inches between the bar and the wall, and structural strength sufficient to withstand 250 pounds of force applied in any direction at any point. Our detailed breakdown of ADA grab bar height covers the toilet and shower specifics.
When to Deviate From the Standard Height
The standard assumes an average adult. A shorter person, a taller person, or someone who uses a wheelchair may be better served by a bar set higher or lower than the published range. If you are unsure what fits your situation, ask your doctor or an occupational therapist, who can watch the actual movement and suggest a height before anything gets drilled.
Common Mistakes When Buying Grab Bars
The most frequent mistake is buying one bar and calling the bathroom done. Grab bars work as a sequence, because a person moving from the door to the toilet to the shower needs something to hold at each transition. Planning the route first usually reveals that two or three bars are needed.
The second is choosing the bar before checking the wall. A beautiful bar in the perfect spot is useless with no framing behind it and no plan for anchors, and discovering that mid installation leads to a compromise placement nobody uses. Matching the faucet finish is also a poor first filter: sort by mounting, length, and grip, then pick the finish.
Frequently Asked Questions
How much weight should a grab bar hold? Check the rating on the specific product listing, since it differs by model and by how the bar is mounted. The ADA standard for public facilities specifies that a grab bar and its mounting withstand 250 pounds of force applied in any direction, and manufacturers commonly design to that figure.
Do grab bars have to go into studs? Into studs is the standard and simplest approach. Where framing is not in the right place, purpose built heavy duty hollow wall anchors or added blocking behind the wall are the two accepted alternatives, and in both cases you follow the anchor or bar manufacturer’s instructions for the rating.
What length grab bar do I need? Long enough to cover the whole movement the hand makes. Bars around 16 to 24 inches suit a single point of support such as beside a toilet, while 32 to 42 inch bars suit tub walls and longer shower runs where the hand travels with the body.
Are suction grab bars safe? They are sold by their own manufacturers as balance aids, not as weight bearing supports, so they should never be the only thing between a person and a fall. They are reasonable for travel or as a light steadying handle, and they need the seal rechecked before each use.
Can grab bars be installed on tile? Yes, routinely. The screws must still reach solid framing or approved anchors behind the tile, and the tile is drilled with a carbide or diamond bit at low speed, then sealed around the flange.
How many grab bars does a bathroom need? Most bathrooms end up with two or three: one at the shower or tub entry, one inside the wet area, and one beside the toilet. Our planning walkthrough maps this out room by room.
What is the difference between a grab bar and a towel bar? A grab bar is engineered and mounted to take a person’s weight; a towel bar is not, regardless of how similar the two look. Never leave a towel bar where someone might reach for it during a slip.
The Bottom Line
The best grab bar for your home is the one anchored properly in the spot where the movement actually happens, which makes mounting method and placement the two decisions worth spending time on. Straight stainless bars cover most needs, angled bars help with standing up, and flip up bars solve tight spaces, while suction cup models stay in the travel and steadying category. Once you have chosen, our guide to installing grab bars covers the practical side, and where to place grab bars covers the layout.