Last updated: August 20, 2026
Some links on this page are affiliate links. If you buy through them we may earn a commission at no extra cost to you. See our affiliate disclosure.
A grab bar in the wrong place is not a small mistake. It is a hole in the tile, a bar nobody reaches for, and a household that now believes the bathroom has been dealt with. Placement is the decision that determines whether the whole project was worth doing, and it is the one most people spend the least time on.
The good news is that getting it right does not require a professional assessment or a tape measure full of standards. It requires watching one person move through the room and marking the spots where their hand goes. This guide covers how to do that, zone by zone, plus the published reference heights worth borrowing.
Quick Answer
Where should grab bars be placed?
- At the shower or tub entry, a vertical bar at roughly chest height where the hand holds while a foot crosses the threshold.
- Inside the wet area, a horizontal or angled bar on the long or back wall that the hand can travel along while turning.
- Beside the toilet, positioned forward enough that the hand reaches it during the actual rise, not level with the middle of the bowl.
- Anywhere the person already grabs a towel bar, a countertop edge, or a door frame, because that is a handhold in use.
Bottom line: mark the positions by watching the movement, then work out the mounting, never the other way round.
Start by Watching, Not Measuring
Ask the person who will use the bathroom to move through it normally while you watch. Where does a hand go out to steady? What do they hold while stepping over the tub wall? What do they push on to stand up? Those moments are the placement plan, and they take about five minutes to collect.
Mark each one with painter’s tape at the exact height and position the hand landed. Leave the tape up for a couple of days and see whether the marks still look right in practice. This costs nothing, reveals mistakes before they become holes, and produces a better result than any generic diagram.
Look for the Handholds Already in Use
A towel bar pulled slightly out of the wall, a loose toilet paper holder, a countertop edge worn smooth in one spot, a doorframe with a shiny patch. These are handholds the household has already chosen, and they are the highest value positions in the room because the habit is established.
Placement Zone by Zone
The zones below cover almost every home bathroom. Use them as a starting checklist and then correct against what you saw during the walkthrough.
The Tub or Shower Entry
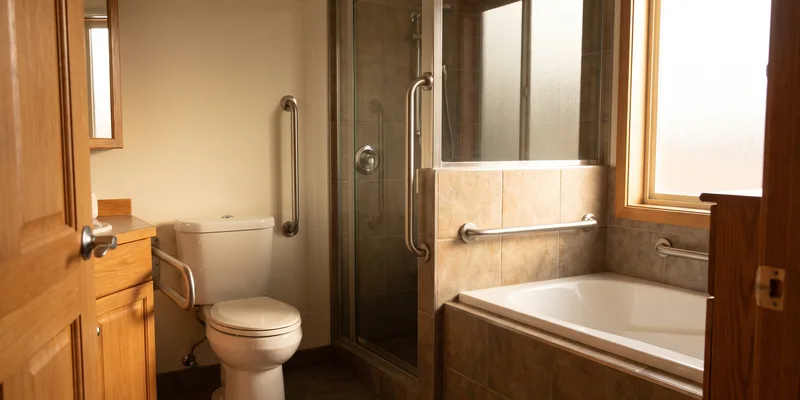
The threshold is where balance is most at risk, because it is a one legged step with a wet foot over an edge. A vertical bar just inside or just outside the opening, positioned so the hand can grip at around chest height and pull upward and forward, is the single most useful bar in most bathrooms.
Inside the Wet Area
Once inside, the hand needs to move with the body during turning, reaching, and bending. A longer horizontal bar on the back or long wall serves that, and an angled bar suits a stall where the movement is more diagonal. If a shower seat is used, add a bar within easy reach of the seated position, which is lower than the standing height.
Beside the Toilet
The most common toilet placement error is mounting the bar too far back. During the rise, the hand travels forward and up, so a bar level with the middle of the bowl ends up behind the hand. Mark the position while the person actually stands up rather than while they sit.
The Doorway and the Sink
These earn a bar when the floor gets wet, when the threshold into the room has a lip, or when the person turns sharply between fixtures. A short vertical bar near the door frame is usually enough, and it does not have to look clinical in a finish that matches the room.
Beyond the Bathroom
Placement thinking does not stop at the bathroom door. A bar beside a bed, at the top or bottom of a staircase, or next to an entry step solves the same problem in a different room. A tension mounted floor to ceiling pole is often the practical answer where there is no suitable wall.

Heights, and the Published Reference Points
Once you have positions, you need heights. The ADA Standards for Accessible Design apply to public and commercial facilities rather than homes, but they are the clearest published reference available and manufacturers design their bars to them, so they are a sensible default to start from.
| ADA reference point | What the standard specifies |
|---|---|
| Bar height | Top of the gripping surface 33 to 36 inches above the floor |
| Wall clearance | 1 and 1/2 inches between the bar and the wall |
| Bar diameter | Circular cross section of 1 and 1/4 to 2 inches |
| Toilet side wall bar | At least 42 inches long, no more than 12 inches from the rear wall |
| Toilet rear wall bar | At least 36 inches long |
| Structural strength | Withstands 250 pounds of force applied in any direction |
Our full breakdown of ADA grab bar height covers how these apply in a home context and where home bathrooms usually diverge from them.
When to Deviate From the Reference Height
The published range assumes an average adult standing. A noticeably shorter or taller person, someone who transfers from a wheelchair, or someone using a shower seat may all be better served outside it. If you are unsure what fits your situation, ask your doctor or an occupational therapist, who can watch the movement in the actual room.
Placement Mistakes That Waste the Whole Job
The biggest is letting the framing choose the position. If the stud is not where the hand needs a bar, the answer is heavy duty anchors or added blocking, not a compromise position. Our guide to installing grab bars without studs covers how.
The second is placing one bar and stopping. Support works as a sequence, because a person crossing a bathroom needs something to hold at each transition, and a gap in that sequence is exactly where they let go.
Mounting Where It Looks Tidy
A bar centred neatly on a tile, aligned with a shelf, or matched to the towel rail height looks deliberate and may be several inches from where the hand goes. Appearance is worth caring about after position is fixed, not before.
Frequently Asked Questions
Where should grab bars be placed in a shower? A vertical bar at the entry for crossing the threshold, and a horizontal or angled bar on the long or back wall for turning and steadying. If a shower seat is used, add one within reach of the seated position.
What height should a grab bar be installed at? The ADA standard for public facilities specifies the top of the gripping surface 33 to 36 inches above the floor. At home, treat that as a starting point and adjust to the person and the movement.
Where do grab bars go around a toilet? Forward enough that the hand meets the bar during the rise rather than while seated, on the nearest side wall where one exists, or as a flip up bar on the rear wall where it does not.
Should a grab bar be inside or outside the shower? Both positions have a job. Outside or at the opening supports the step in and out; inside supports turning and reaching. Most bathrooms benefit from one of each.
How far apart should two grab bars be? Close enough that the hand can move from one to the next without letting go entirely. Walk the movement with tape marks in place and check for any point where both hands are free.
Can grab bars go outside the bathroom? Yes, and they often should. Beside a bed, at a staircase, or by an entry step are all common, with a tension pole covering spots where there is no suitable wall.
Does the bar have to be level? Horizontal bars should be level, and angled bars should follow a consistent, deliberate angle. An accidentally sloping bar can twist the flanges as it is tightened.
How many grab bars does one bathroom need? Typically two or three. Our planning guide walks through how to count them for your layout.
The Bottom Line
Placement comes from watching the person move, marking each spot where a hand goes out, and leaving the tape up for a few days before drilling. Entry, wet area, and toilet cover most bathrooms, and the ADA heights are a useful reference to start from rather than a rule for your house. Once the positions are settled, our guide to installing grab bars covers the drilling, and the grab bar buying guide covers choosing the bars themselves.