Last updated: August 20, 2026
Some links on this page are affiliate links. See our affiliate disclosure.
Fitting a raised toilet seat is one of the few home safety jobs that genuinely takes less than fifteen minutes. Most clamp-on models need no tools at all, and the hinged versions need one adjustable wrench and a little patience with old bolts. The part that goes wrong is almost never the installation itself, it is a seat that was never going to fit that particular bowl.
This walkthrough covers the three installation types you are likely to face, the checks to run before and after fitting, and what to do when a riser will not sit flat or keeps shifting under load. It assumes you have already settled the height question, which is a separate job worth doing first.
Quick Answer
How do you install a raised toilet seat?
- Confirm the seat matches your bowl shape first. Round and elongated are not interchangeable and no amount of tightening fixes a mismatch.
- Clamp-on models drop onto the rim and tighten with wing nuts or a bracket underneath, usually without tools.
- Hinged models replace the existing seat using the same two mounting bolts, which need an adjustable wrench and sometimes a soak in penetrating oil.
- Finish with the wobble test: press down hard on each side and the front edge before anyone uses it.
Bottom line: matching the bowl shape and running the wobble test matter more than anything else in the process.
Before You Start
Two checks save most of the trouble. First, bowl shape: measure from the center of the two seat mounting bolts to the front edge of the rim. Around sixteen and a half inches means a round bowl, around eighteen and a half means elongated. Second, confirm the riser height suits the user, since removing and refitting is easier than living with the wrong height.
Give the rim a proper clean before fitting anything. Clamps and brackets grip better on a dry, residue-free surface, and once the riser is on, the area underneath is awkward to reach. If the height question is still open, our guide to choosing the right raised toilet seat height works through the measurements.
Installing a Clamp-On Riser
Clamp-on models are the quickest of the three. The riser sits on the bowl rim, and a bracket or a pair of wing nuts underneath pulls up against the inside of the rim to hold it. Most take under five minutes and need nothing from the toolbox.
Step by Step
- Lift the existing seat and lid, or remove them entirely if the instructions say to. Some risers fit under the original seat, others replace it.
- Set the riser onto the rim and slide it back until it seats against the rear of the bowl, with the opening centered over the bowl.
- Reach underneath and locate the clamp or the wing nuts on the bracket arms.
- Tighten evenly, alternating side to side rather than fully tightening one first, so the riser stays centered as it draws down.
- Refit the original seat on top if the model is designed to work that way.
Installing a Hinged or Bolt-On Riser
These replace the existing seat and fasten through the same two holes at the back of the bowl, so the result is permanent, tidy, and does not shift. Budget more like fifteen minutes, mainly because old seat bolts can be stubborn.
Step by Step
- Pop open the plastic caps over the existing seat bolts and hold the nut underneath with an adjustable wrench while turning the bolt from above.
- If the nut is seized, a little penetrating oil and five minutes of waiting usually beats force. Plastic bolts sometimes need to be cut rather than turned.
- Lift the old seat off and clean the mounting area thoroughly.
- Set the riser in place, drop the new bolts through both the riser and the bowl holes, and start the nuts by hand.
- Align the riser square to the bowl, then tighten both sides evenly. Snug is the target, since overtightening can crack porcelain.
Installing a Locking Riser
Locking models add a clamp that tightens against the inside of the bowl in addition to sitting on the rim, which stops the riser sliding sideways when weight lands off-center. The sequence matches a clamp-on model, with one extra step: after the riser is centered, tighten the locking knob or lever until the unit no longer moves when pushed firmly from the side.
Do not treat the locking mechanism as a way to force a poorly fitting riser to behave. If a riser only stays put when the clamp is cranked hard, the bowl shape or rim profile is wrong for that model, and the right move is a different riser rather than more torque.
The Wobble Test
Before anyone uses the seat, run the same check every time. With both hands, press down firmly on the left side, then the right side, then the front edge, and watch for any lift, rock, or slide. A correctly fitted riser stays put through all three.
| What you see | Likely cause | What to do |
|---|---|---|
| Rocks front to back | Riser not pushed fully to the rear of the rim | Loosen, reseat, retighten evenly |
| Slides sideways | Clamp not tight, or bowl shape mismatch | Retighten, then check round vs elongated |
| Lifts on one side | Uneven tightening of the two brackets | Loosen both, tighten alternately |
| Overhangs the front rim | Elongated riser on a round bowl | Return and order the matching shape |
Products That Install Without Tools
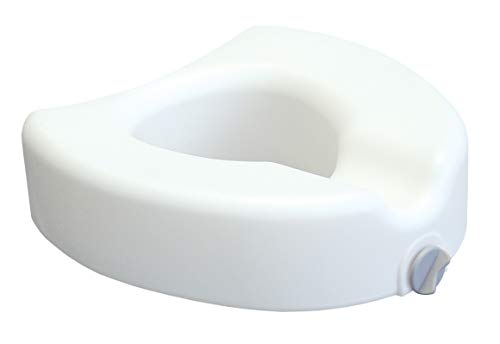
If you would rather avoid the wrench entirely, a tool-free clamp-on riser handles the whole job by hand, which also makes it easy to remove for cleaning or when a guest stays.

Where the riser needs to stay put under uneven loading, a locking model with a clamp is the more stable choice and still installs without drilling anything.
Keeping It Clean After Fitting
Clamp-on risers collect residue where the shell meets the rim, so plan to lift the unit off every week or two for a proper clean underneath. That is one of the practical advantages of a tool-free model over a bolted one, and it is worth factoring into the choice if cleaning falls to someone with limited hand strength.
Hinged models flip up for access to most of the bowl, though the hinge area itself needs attention. Standard bathroom cleaner works on the molded plastic used for nearly all of these, and abrasive pads are best avoided since scratches hold residue.
A Note on Getting Advice
If the riser is fitted correctly and using the toilet is still difficult, the answer is usually a different piece of equipment rather than a different installation. Arms, a floor-standing frame, or a wall-anchored bar each solve a different part of the problem. If you are unsure what fits your situation, ask your doctor or an occupational therapist.
Frequently Asked Questions
Do you need tools to install a raised toilet seat? Most clamp-on models install by hand with wing nuts or a bracket. Hinged models that replace the existing seat need an adjustable wrench, and occasionally penetrating oil for seized bolts.
Why does my raised toilet seat keep moving? The two usual causes are an under-tightened clamp and a bowl shape mismatch. Retighten evenly first, then measure from the seat bolts to the front rim to confirm you have the right shape. A locking model is the more stable option.
Can you leave the original toilet seat on? It depends on the design. Some risers are made to sit under or over the existing seat, others replace it entirely. The instructions for that specific model decide it, so follow them rather than a general rule.
Will installing a riser damage the toilet? Not if it is tightened to snug rather than forced. Overtightening bolts on a hinged model is the main risk, since porcelain can crack, so stop as soon as the unit no longer moves.
How do you remove a raised toilet seat? Reverse the fitting sequence: loosen the clamp or wing nuts evenly, then lift the riser straight up. On a bolted model, hold the nut underneath and turn the bolt from above.
Can you install one on a comfort-height toilet? Yes, though check the finished height first. Comfort-height bowls already sit higher, so adding a five-inch riser can leave the user’s feet off the floor.
How often should the fitting be checked? Repeat the wobble test every few weeks and after any deep clean where the riser was removed. Clamps loosen gradually with use, and catching that early is straightforward.
The Bottom Line
Installing a raised toilet seat is a short job with two things that matter: matching the riser to the bowl shape, and finishing with a firm press on both sides and the front to confirm nothing moves. Clamp-on models go on by hand, hinged models need a wrench and even tightening, and locking models add a clamp that stops sideways slide. If the riser still shifts after retightening, the shape is wrong rather than the technique. For choosing the model itself, see our raised toilet seat guide.